Install Instructions
There is a small chance that you may brick your keyboard in the flashing process, continue at your own risk. Use an appropriate cable, make sure you won’t lose power during flashing and follow the steps carefully.
This guide doesn’t cover bluetooth connectivity, following this guide will disable your keyboards bluetooth mode.
Feel free to ask in our Discord Server if you encounter any problems.
Table of contents
- 1. Identifying your Microcontroller Unit (MCU)
- 2. Setup QMK Enviroment
- 3. Compiling your keyboard firmware
- 4. Flashing the Firmware
1. Identifying your Microcontroller Unit (MCU)
This part is crucial since this is where you determine if the keyboard you are trying to flash is compatible with this project.
There are several ways to identify the MCU but the best way is to remove your keyboard’s printed circuit board (PCB) from the case and taking a look at the serial number printed on the MCU.
The MCU is usually one the biggest chip in the PCB, it should look something like this.
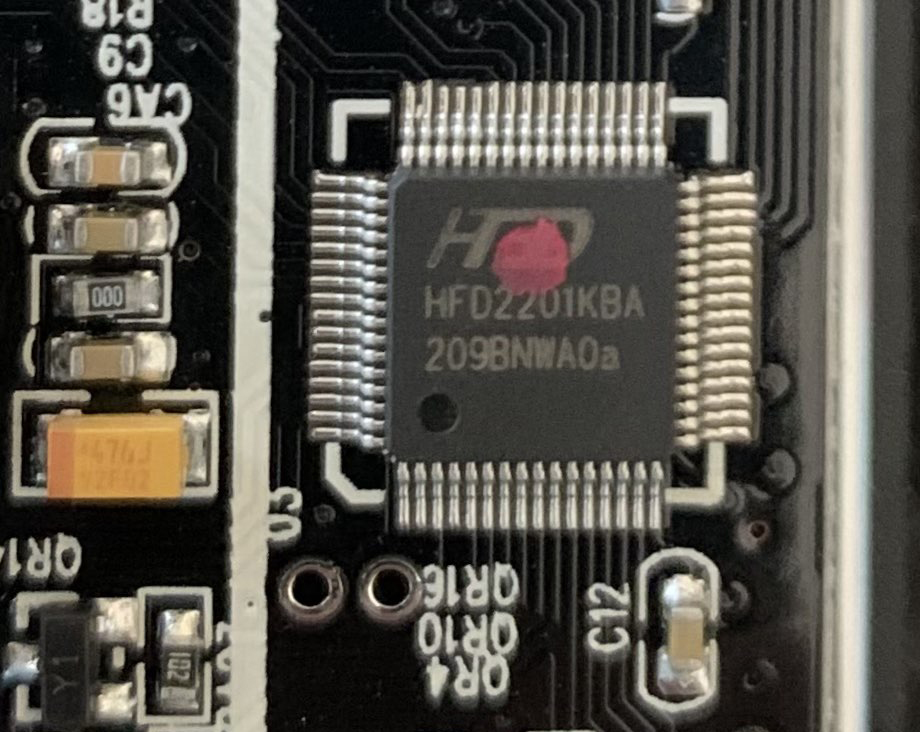
Please refer to the table down bellow to identify its Sonix model (if applicable) since going forward in this guide we are only going to refer to it by its Sonix model. e.g: In the picture above the MCU is a HFD2201KBA but its Sonix counterpart is a SN32F248B.
MCU List. Click to expand!
| Company | MCU | Rebrand company | Rebrand MCU | Type | Pin |
|---|---|---|---|---|---|
| eVision | VS11K09A | SONIX | SN32F248 | ARM Cortex-M0 | LQFP 64 Pins |
| eVision | VS11K09A-1 | SONIX | SN32F248B | ARM Cortex-M0 | LQFP 64 Pins |
| eVision | VS11K13A | SONIX | SN32F268 | ARM Cortex-M0 | LQFP 48 Pins |
| eVision | VS11K15A | SONIX | SN32F268 | ARM Cortex-M0 | LQFP 48 Pins |
| eVision | VS11K16A | SONIX | SN32F268 | ARM Cortex-M0 | LQFP 48 Pins |
| eVision | VS11K17A | SONIX | SN32F268 | ARM Cortex-M0 | LQFP 48 Pins |
| eVision | VS11K20A | SONIX | SN32F268 | ARM Cortex-M0 | LQFP 48 Pins |
| HFD | HFD2201KBA | SONIX | SN32F248B | ARM Cortex-M0 | LQFP 64 Pins |
| HFD | HFD48KP500 | SONIX | SN32F268 | ARM Cortex-M0 | LQFP 48 Pins |
| HFD | HFD64KG800 | SONIX | SN32F248B | ARM Cortex-M0 | LQFP 64 Pins |
| SONIX | SN32F248 | No | No | ARM Cortex-M0 | LQFP 64 Pins |
| SONIX | SN32F248B | No | No | ARM Cortex-M0 | LQFP 64 Pins |
| SONIX | SN32F268 | No | No | ARM Cortex-M0 | LQFP 48 Pins |
Continue to the next step only if your MCU is compatible.
2. Setup QMK Enviroment
Before you can compile the firmware; you need to install the tools and the enviroment to build it. Manual compilation is preferred over using the pre-compiled firmwares since it will allow you to modify various aspect of it.
2.1 Preparing build enviroment
Please follow QMK instructions to setup the build enviroment.
Come back to this page before running qmk setup!!!
2.2 Setting up QMK Enviroment
After installing QMK run the following command:
qmk setup SonixQMK/qmk_firmware -b sn32_master
In most situations you will want to answer y to all of the prompts.
3. Compiling your keyboard firmware
Now that your enviroment is configured, you can compile one of the default keymaps for your keyboard. Keep in mind that this step varies between keyboards since nearly all compatible boards are mantained by different people.
The command format to compile is a follow:
qmk compile -kb <keyboard> -km <keymap>
For example, to build the Redragon K530, you would use:
qmk compile -kb redragon/k530 -km default
Another example to build the ISO variant of the Keychron K2 RGB
qmk compile -kb keychron/k2/rgb/iso -km iso
When done you will see and output similar to this:
Linking: .build/keychron_k2_rgb_iso_iso.elf                                                         [OK]
Creating load file for flashing: .build/keychron_k2_rgb_iso_iso.hex                                 [OK]
Size after:
   text    data     bss     dec     hex filename
      0   48514       0   48514    bd82 .build/keychron_k2_rgb_iso_iso.hex
Creating binary load file for flashing: .build/keychron_k2_rgb_iso_iso.bin                          [OK]
Copying keychron_k2_rgb_iso_iso.bin to qmk_firmware folder                                          [OK]
(Firmware size check does not yet support SN32F248BF; skipping)
Compilation tip
To reduce the compilation time you can add the
-j <number of cores>flag to theqmk compilecommand. e.g:qmk compile -j 8 -kb redragon/k530 -km default
4. Flashing the Firmware
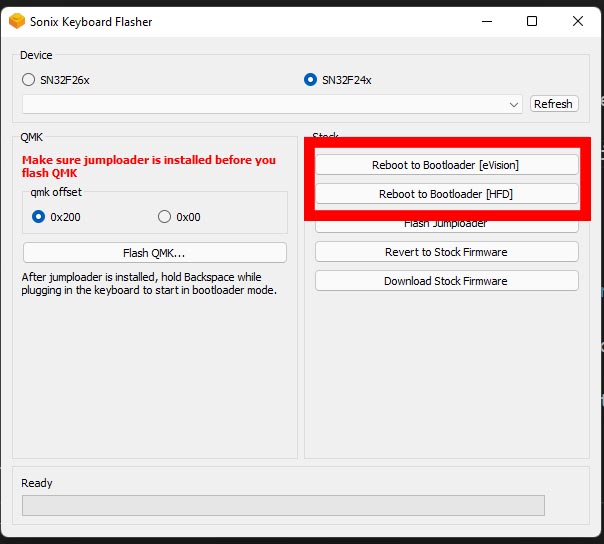
4.1 Downloading the flasher
The Sonix Flasher is a community driven flasher for the SN32F248(B) and SN32F268 boards. It has been specially developed to reduced the number of bricked SN32F268 boards thanks to the ability to flash a special piece of code called “Jumploader” (more on that later).
For now, you will need to download the Sonix Flasher from here
4.2 Entering Bootloader mode
The Sonix MCUs has the ability to enter a special mode called “bootloader” mode, in this mode, the flasher can upload the firmware to the MCU.
To facilate the process of entering the “bootloader” mode, we suggest trying the option “Reboot to Bootloader” of the Sonix Flasher. Please select the appropiate option depending on your vendor.
You know it is in Bootloader mode if your board is connected to your PC and your board doesn’t respond to keypress and the RGB/backlight is off.
Continue to Flashing the keyboard if you entered Bootloader mode, otherwise please proceed with the instructions below depending on your board:
Bootloader mode in SN32F248B Boards. Click to expand!
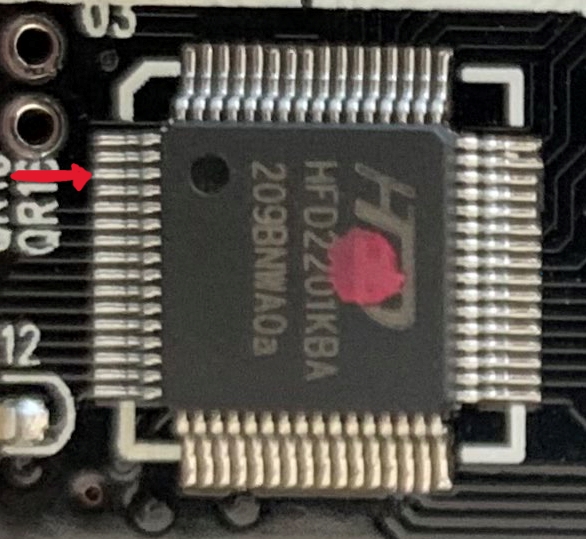
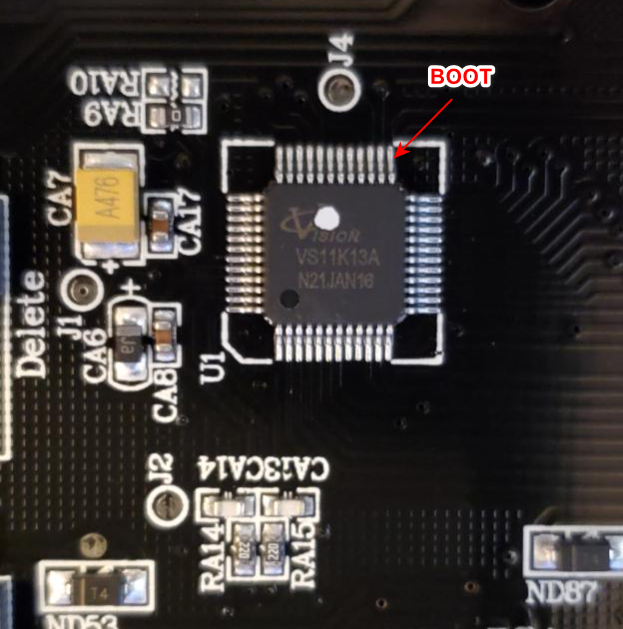
The Sonix SN32F248B can be put in Bootloader mode by shorting the “BOOT” pin to ground (GND) before powering the board.
The BOOT pin is located at pin 3 (see picture bellow), you will need to short this pin with GND, for example the USB connector housing.
Grab a piece of wire and try to place one end on the BOOT pin and the other end on GND, and with a little help of someone, try to connect the board using its USB cable to your computer.
You know it is in Bootloader mode if your board is connected to your PC and your board doesn’t respond to keypress and the RGB/backlight is off.
Bootloader tip
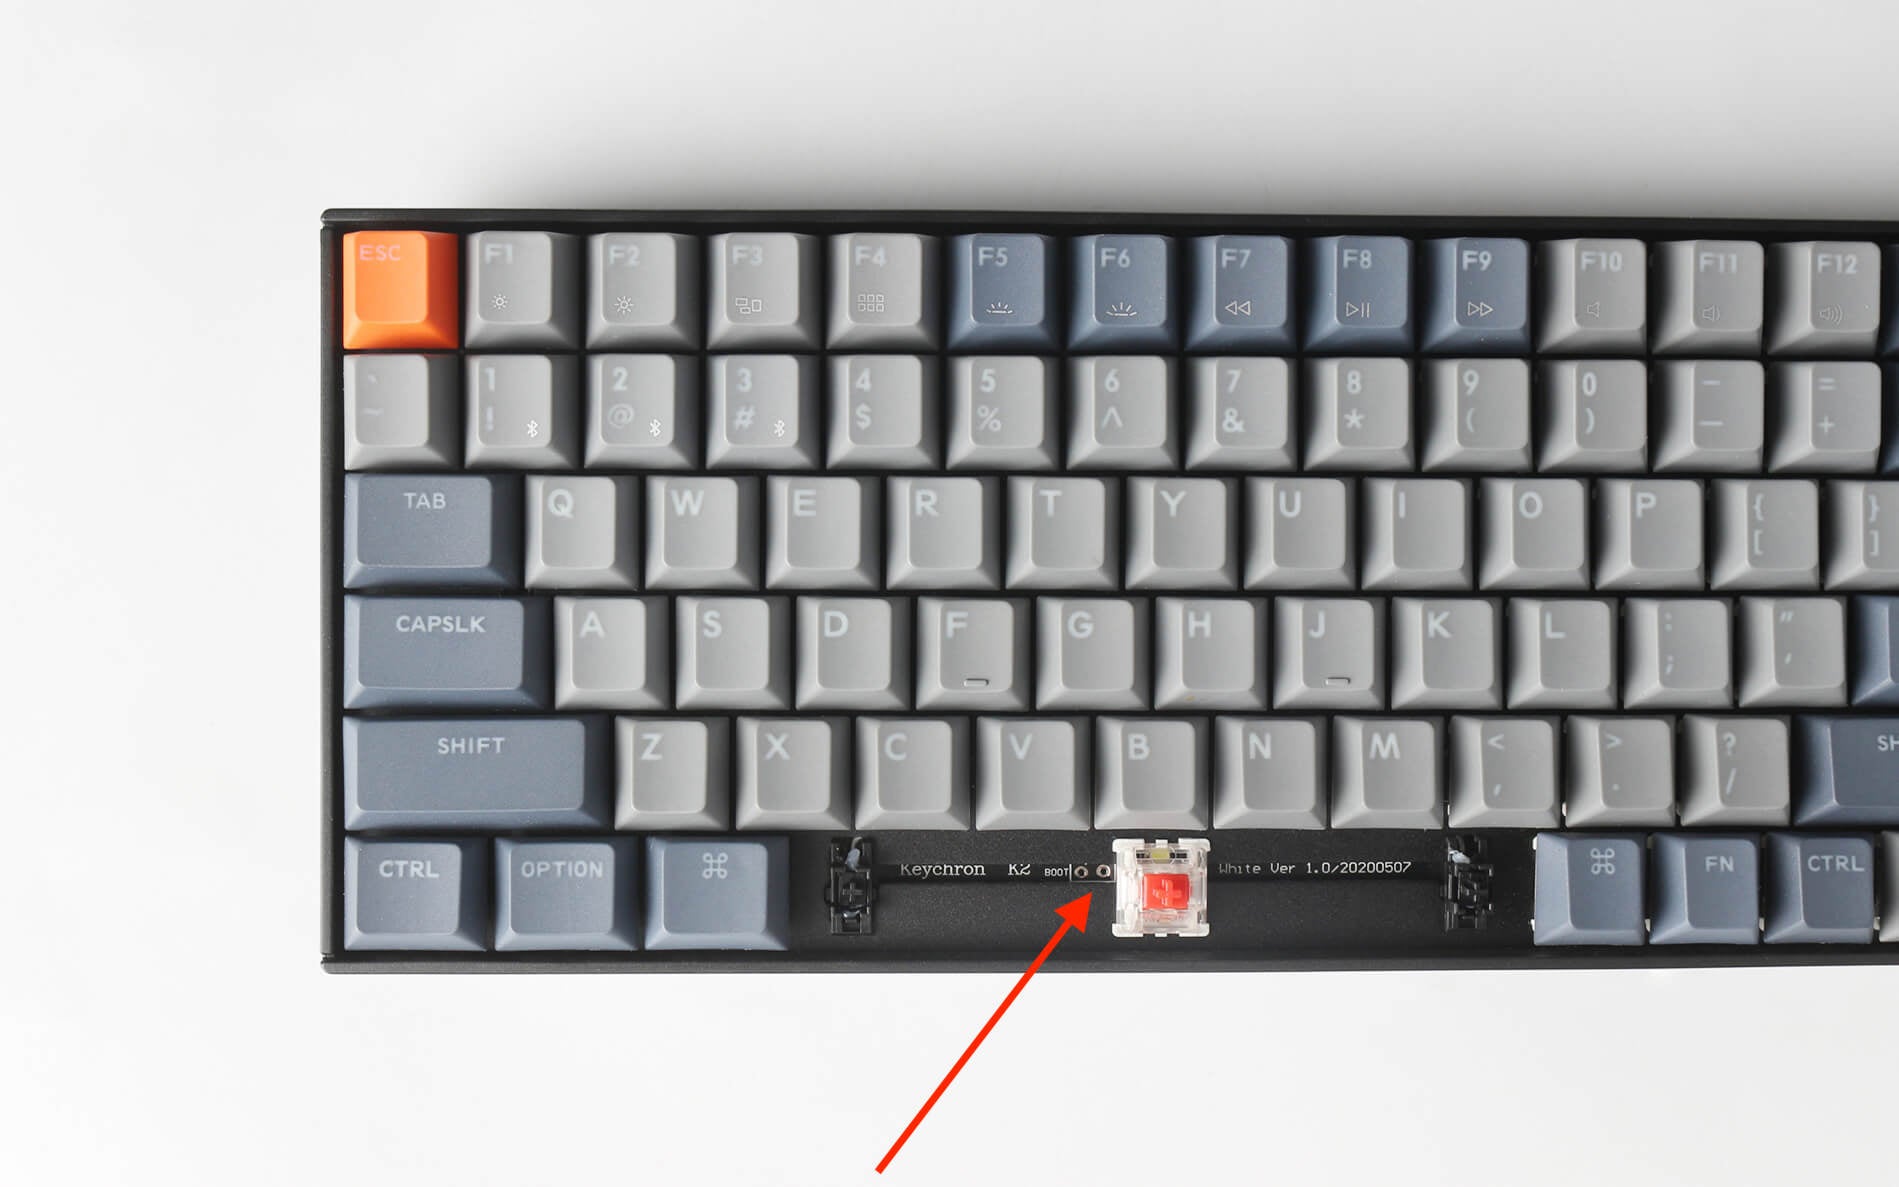
On certain boards, the manufacturer could place two test pads that are connected to BOOT and GND so it can be easier to put the board in Bootloader mode. For example, Keychron boards usually have these two pads bellow the spacebar so they can be shorted using a pair of tweezer.
Keychron Testpads
It is not always a given that these pads are accesible, be sure to ask us in our discord server if you have any doubts.
Bootloader mode in SN32F268B Boards. Click to expand!
The Sonix SN32F268 can be put in Bootloader mode by shorting the “BOOT” pin to ground (GND) before powering the board.
The BOOT pin is located at pin 25 (see picture bellow), you will need to short this pin with GND, for example the USB connector housing.
Grab a piece of wire and try to place one end on the BOOT pin and the other end on GND, and with a little help of someone, try to connect the board using its USB cable to your computer.
You know it is in Bootloader mode if your board is connected to your PC and your board doesn’t respond to keypress and the RGB/backlight is off.
4.3 Flashing the keyboard
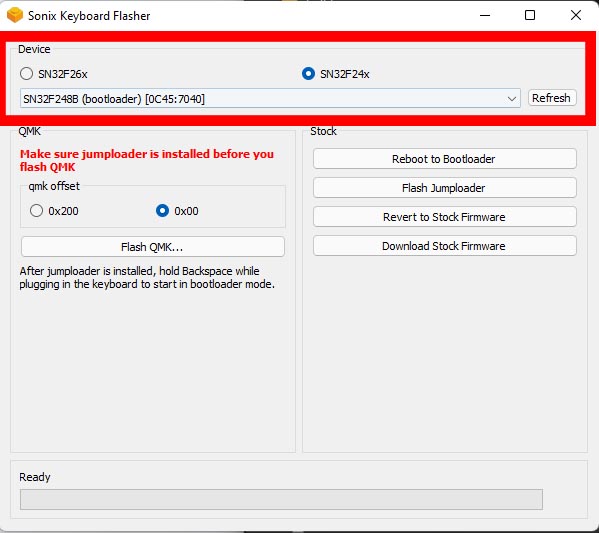
Be sure to set your keyboard in Bootloader mode and then open Sonix Flasher, your board should be detected and it should display the MCU name followed by “bootloader”:
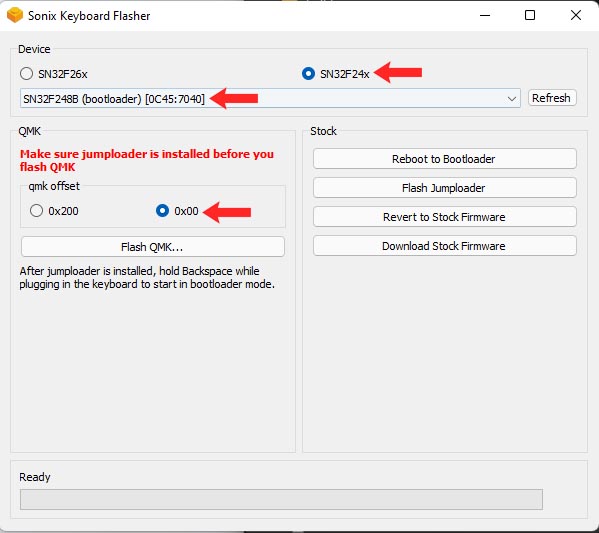
Flashing SN32F248B boards. Click to expand!
Confirm that:
- The SN32F24x radio button is selected
- Your board is selected from the dropdown list
- The qmk offset is set to “0x00”
Press the “Flash QMK…” button:
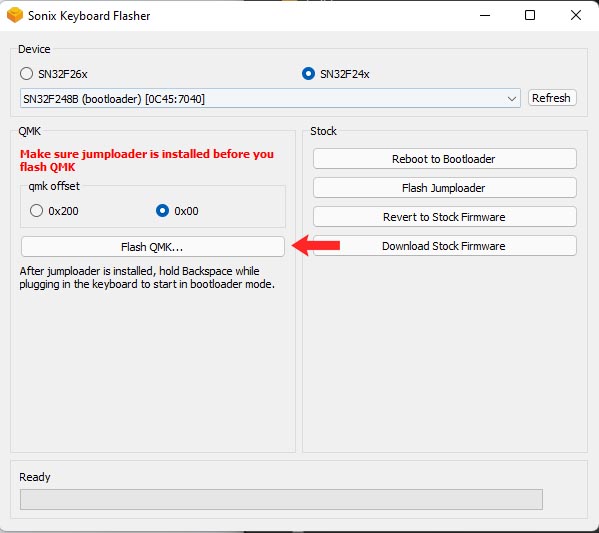
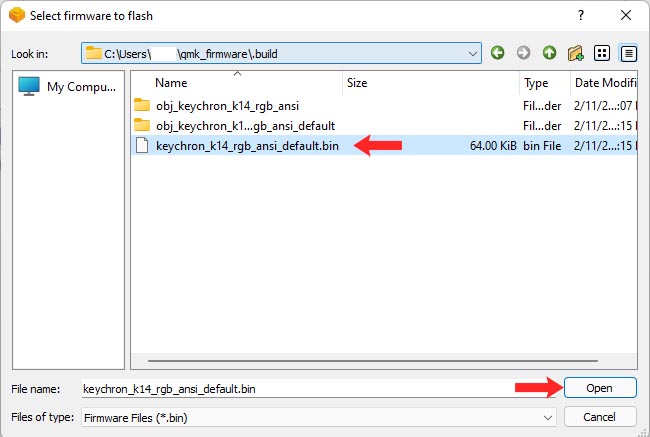
Select the *.bin that you built previously (it will be located at “qmk_firmware/.build” ) and hit “Open”. The moment you press this button it will start to flash
Flashing SN32F268B boards. Click to expand!
TODO…
In the meantime, follow CalcProgrammer1’s video guide
If everything went right, your keyboard will be flashed with QMK and ready to go!